
 I thought it would be cool to share with you all Jerry’s original instructions for his fabulous Glaser Screw Chuck. So here it is:
Your Glaser Screw Chuck with a reversible and removable collar is designed to provide woodturners with a reliable and simple way of holding wood on a lathe for turning. The basis for the Glaser Screw Chuck is a unique screw developed to provide exceptional holding power in all kinds of wood.
To mount a piece of wood on the chuck, is necessary to do the following:
Flatten one face on the block of wood to be turned and drill a” diameter hole, about ¾” deep in the center of the flattened face. The block is then screwed to the chuck until the wood is tight against the face of the chuck. It is important to use the largest collar diameter that you project will allow to assure maximum stability. The reversible and removable collar extends the range of the screw chuck from 1-1/2” to 2-1/2” to 3-1/2” diameter. Using the largest collar size permits the turning of reasonably large plates. The important features of the chuck are as follows:
Screw
The screw is machined out of a very high strength, heat treated, stainless steel. A thread grinder is used to form the thin, sharp thread. The very thin, very smooth and precisely formed thread is an important feature of the screw allowing it to penet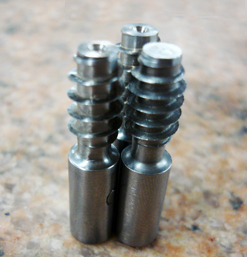 rate the wood easily with minimal damage to the surrounding wood structure. The sketch below shows the principal dimensions of the 3/8” diameter screw.
A ¼” diameter hole drilled to a depth of a little more than ¾” is sufficient for mounting the workpiece. Since the ¼” hole and the root diameter of the screw are the same, the fit of the workpiece to the screw is exact. This allows the removal of the workpiece from the chuck and subsequent remounting without loss of concentricity. The usefulness of this feature will be appreciated in many applications.
Woodshop instructors, for instance, need not purchase many faceplates as one Glaser Screw Chuck on each lathe will allow students to partially turn a bowl, as an example, remove it and remount it precisely at some later turning session to finish it. Green wood can be roughed out and removed to dry and remounted after drying for turning to final shape, provided the mating face of the dry wood is flattened. Wood as hard as lignum vitae can be attached to the screw chuck if the hole for the screw is drilled a little larger than the recommended ¼” diameter – 9/32” diameter should be adequate.
To start the screw into the wood, the workpiece should be forced firmly against the screw while the chuck is rotated. If the wood is hard and dry, some lubricant such as soft wax will reduce the friction and the force required for installation. It will also help with removal of the wood from the chuck. The friction between the screw and wood appears to increase with time and removal of the workpiece is sometimes difficult if no lubricant is used.
Screw Chuck
The Screw Chuck body and collar are made or hard aluminum (2024-T6) and are anodized for w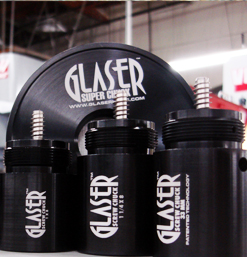 ear resistance. Any of the three face diameters can be selected depending on the size of the part being turned.
The smallest face diameter is 1-1/2” which can easily support blocks of wood 6” in diameter by 4” to5” long. When turning larger pieces, the collar can be installed with either the 2-1/2” face or the 3-1/2” face toward the wood, depending on the size and weight of the wood workpiece.
All three faces are recessed or relieved to contact the workpiece at the largest diameter possible and thus provide maximum stability and support to the part being turned. Large thin platters can be turned by gluing the blank to a small block of ¾” thick hard wood, such as maple, which is then screwed to the chuck. Both, the Screw Chuck body and the collar, are drilled in two places 180 degrees apart to accept a ¼” diameter “tommy bar” to aid in the removal of the chuck from the lathe spindle and the collar from the chuck body. Two “tommy bars” are supplied with each chuck. They are made of heat treated stainless steel. When installing the chuck on a threaded spindle, screw it on hand tight. If this is not done, starting the lathe will jam a loose chuck against the shoulder of the spindle making it very difficult to remove later. Also make sure that the lathe spindle threads are clean before mounting the chuck.
SOME GENERAL NOTES ON USING THE CHUCK
Before turning plates or platters, it is necessary to round them up on a bandsaw. It would be very dangerous to do it on the lathe. If the grain of the wood runs parallel to the lathe bed, the block can be turned from the square since this is the same as turning a spindle between centers. If the overhang of the workpiece appears to be excessive for the rough turning from the square, the tailstock should be brought up for additional support. Green wood is not as strong as seasoned wood and this must be kept in mind when mounting such wood on the screw chuck. The chuck screw will not hold as well as in dry wood. Additional support from the tailstock is advised. When mounting wood as soft as balsa on the chuck, the wood can be made stronger locally, where the screw enters the wood, by wetting the hole with a few drops of cyanoacrylate cement (use the thin fluid type). The cement hardens the wood and provides a better grip for the screw.
A screw chuck based on these designs principles has been used by me for the last 35+ years on my 1920 Oliver lathe. By now, I know the limits of the screw chuck and the lathe. The Oliver is a heavy lathe with a large spindle and ball bearings. The screw chuck with the 3/8” diameter screw will hold large pieces of wood for turning, however, you will have to determine the limits of what can be done with the Glaser Screw Chuck and your lathe. Be aware that a light duty lathe will not allow you to take heavy cuts of the kind permitted on a heavy lathe. In general, the lathe will be the limiting factor and not the chuck. Enjoy!